 |
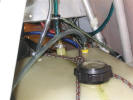
Photo 1: Shows the main fuselage tank with
new fittings. The line and fitting to the left of the main draw line
is the 5/16 vent lines which goes up about 10in. and then down to the main
gear leg opening to vent to the outside. This way no fuel fumes inside
the cockpit. The fitting and line to the right is the 5/16 inlet line from
the auxiliary fuel pump. This fitting just extends about 1/4in into
the tank (just to the bottom of the threads). A pinch clamp is used to
secure the fuel line to the fitting for easy removal. |
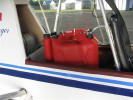 |
Photo 2: This photo shows the fuel cans
strapped into the back seat with the lines hooked up. I use two 5Gal
cans side by side. This gives me room to be able to reach back and
secure the rear catches on the doors. Also notice the highlighted
markings on the main fuel tank and the rear seat flap is left down.
This is so that I can see the fuel level in the mirror mounted above the
pilots seat. Also notice the gentle loops in the fuel line to prevent
any kinks. |
 |
Photo 3: A close up of the fuel pump used in
the project. It can transfer 5 Gal in about 12 minutes. I just
use two tie-wraps to secure it to one of the fuel can handles and just use a
small flat-tip screwdriver to re-open the ties to reuse them. A couple
of Velcro straps could also be used. |
 |
Photo 4: Another shot of the layout in the
backseat. I am just using one fuel can at a time as after almost 3 hrs
of flight, its time to set down to stretch my legs. I just switch over
to the other can while I'm on the ground. Hint: make sure to loosen
the jerry can vents slightly so that you can loosen them in flight from the
front seat. |
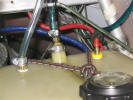 |
Photo 5: With system removed, I use a plastic
cap to cover the inlet line to prevent any dirt or debris from getting in
the tank. When system is in use, I put the little red plastic cap on the
switch lever on the panel to prevent its loss. |
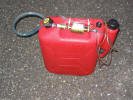 |
Photo 6: Another shot with system totally
removed from aircraft. The power line has a two-conductor trailer plug on
the end of the cable that plugs into it's mate just under the panel. The
panel end is run through the Master switch then to another switch marked Aux
Fuel. The tank end of the fuel line is run through the plastic fuel cap with
a short piece (3in) of copper line to another 5/16 line inside the tank. The
end of this is weighted with another brass fitting to keep it on the bottom
of the tank. A solid copper line could be used, but the flexible line allows
the whole system to be coiled up for storage. The yellow plastic tank cap
and retainer ring stays attached to the line and I carry a second cap and
retainer in the aircraft for long flights. This way, when you are at another
airport, you can remove both tanks and take them to the gas station for
refueling when no facilities are available. The bonus with the whole
system is that it is non-invasive to the aircraft fuel system. There is no
plumbing into the existing fuel system that can go wrong and leave you
looking for a landing site. Used correctly, that is, by allowing the main
tank to go down to just below the 5Gal mark, then turning on the pump to
re-fill the tank, you will still have 5 Gal in the main if something does go
wrong. |
